Alpa repository setup
Alpa allows you to create your own repository, which you can manage yourself. For the correct functioning of the software repository as a whole, it is important to pay attention to the following settings, because some parts of different programs might behave strangely and it might even happen that the repository stops packaging the software.
Caution
In some steps you may have to disallow some checking when setting up the repository
like force git add through gitignore or skip pre-commit hooks, because they checks
pushing to main branch.
Use template repository
Use the repository template already prepared here. Then click on Use this template
button and select Create a new repository.
The repository contains main branch with pre-configured files. You will specify the
configuration in some of them later.
GitHub settings
Set up your repo:
Go to your repository you just created from template repository mentioned above.
Then go to
Settingsand search forAutomatically delete head branchesinGeneraland check in this option.
Activate Packit:
Activate Packit for your Alpa repository
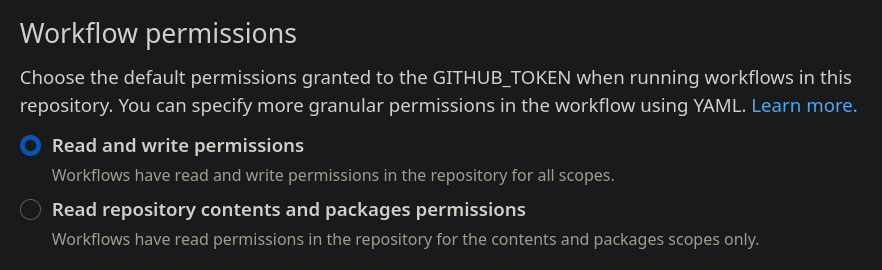
If you want to use Alpa’s GitHub Actions:
Go to your repository
Settingson GitHubClick on
Actionssection and selectGeneralsubsectionFind
Workflow permissionsand selectRead and write permissions
Create Copr repository
Go to Fedora Copr and log in to your account. If you don’t have one, just create a new account on https://accounts.fedoraproject.org/.
On main page, click on
New Project. Alpa will build all packages from GitHub repository to this repository in Copr.Select a name for your repository
Under the
2. Build optionsselect all chroots you want to build for. This can be changed later.In
4. Other optionssection find thePackit allowed forge projectsfield and fill in the path to your repository on GitHub. E.g. if your repository URL ishttps://github.com/nikromen/test-repothen put theregithub.com/nikromen/test-repo.Click
CreateDo this again for a new project, just put
<previous project name>-pull-requestsin the name field when creating a new project.
Caution
I recommend to let the Follow Fedora branching checked, because when new Fedora is
released, Copr will automatically build packages for the new Fedora.
Configure content of repository
Tip
Before proceeding, I recommend you to read the documentation about the command line interface to get a bit familiar with it, because we will use it now. See Alpa CLI manual
Now back to your GitHub repository. Clone it to your machine using the alpa clone command.
Now open the .alpa.yaml file. It will look like this:
---
repo_type: branch
copr_owner: # fill in the owner of copr repository
copr_repo: # fill in the copr repository
Fill in the correct Copr repository and Copr owner to it. The Copr repo is name of your Copr repository you previously created and Copr owner is your username.
If you want to know more about the .alpa.yaml configuration file, please see its documentation
in the Repo config file section.